Raspberry Pi4 画像認識 ~⑦独自画像学習 推論~
独自の画像を使って学習モデルを作るところまで完了しました。
実際にcolab上で学習に使用していない新しい画像を用いて、推論を行ってみましょう。
1. 下準備
!pip install tflite-support
from pathlib import Path
import cv2
from PIL import Image
import numpy as np
import matplotlib.pyplot as plt

import tensorflow as tf
from tflite_support import metadata
MODEL_PATH = Path("※model.tfliteのパス")
IMAGE_PATH = Path("※新たな画像のパス")

IMAGE_LIST = list(IMAGE_PATH.glob('*'))
今回は、学習で使用していない「新たな画像」をどこかから入手してgoogle driveに保存します。
手っ取り早いのはスマホで撮影した画像でよいかと思います。
ただし、iPhoneで撮影した画像は「.HEIC」という形式のため、「.jpg/.png」に変換する必要がありますので注意してください。
2. tfliteモデル内の情報を抜き出す
公式のプログラムをそのまま上から実行していけば、推論までたどり着きますが、
ラズパイへ移行した後に、tfliteのメタデータを取得する方法が記載されていなかったため、
ここでは、別プログラムとして推論を行います。
displayer = metadata.MetadataDisplayer.with_model_file(MODEL_PATH)

print("Associated file(s) populated:")
for file_name in displayer.get_packed_associated_file_list():
  print("file name: ", file_name)
  print("file content:")
  print(displayer.get_associated_file_buffer(file_name))
Associated file(s) populated:
file name:  labelmap.txt
file content:
b'label\nScissors\nrock\npaper\n'
学習したtfliteモデルで推論した結果から、ラベルデータや、推論値、bbox値等を取得しなければなりません。
ラベルデータ以外は公式プログラムをそのまま参照できるので、ラベルデータを探します。
label = str(displayer.get_associated_file_buffer(file_name))
label = label[2:]
label_list = label.split('\\n')

classes = label_list[:-1]
print(len(classes))
print(classes)
ラベル出力のリスト中に、'label'を含ませる必要があります。
3. 推論用関数の定義
def preprocess_image(image_path, input_size):
    """Preprocess the input image to feed to the TFLite model"""
    img = tf.io.read_file(image_path)
    img = tf.io.decode_image(img, channels=3)
    img = tf.image.convert_image_dtype(img, tf.uint8)
    original_image = img
    resized_img = tf.image.resize(img, input_size)
    resized_img = resized_img[tf.newaxis, :]
    resized_img = tf.cast(resized_img, dtype=tf.uint8)
    return resized_img, original_image
「.jpg/.png」形式のデータを、学習モデル.tfliteが読めるように変換する関数です。
def detect_objects(interpreter, image, threshold):
    """Returns a list of detection results, each a dictionary of object info."""

    signature_fn = interpreter.get_signature_runner()

    # Feed the input image to the model
    output = signature_fn(images=image)

    # Get all outputs from the model
    count = int(np.squeeze(output['output_0']))
    scores = np.squeeze(output['output_1'])
    classes = np.squeeze(output['output_2'])
    boxes = np.squeeze(output['output_3'])

    results = []
    for i in range(count):
        if scores[i] >= threshold:
            result = {
            'bounding_box': boxes[i],
            'class_id': classes[i],
            'score': scores[i]
            }
            results.append(result)
    return results
画像の中の物体を推論するための関数です。
ここで、推論値やbboxの値がわかります。
結果は、辞書として出力されてきます。
def run_odt_and_draw_results(image_path, interpreter, threshold=0.5):
    """Run object detection on the input image and draw the detection results"""
    # Load the input shape required by the model
    _, input_height, input_width, _ = interpreter.get_input_details()[0]['shape']

    # Load the input image and preprocess it
    preprocessed_image, original_image = preprocess_image(
        image_path,
        (input_height, input_width)
    )

    # Run object detection on the input image
    results = detect_objects(interpreter, preprocessed_image, threshold=threshold)

    # Plot the detection results on the input image
    original_image_np = original_image.numpy().astype(np.uint8)
    for obj in results:
        # Convert the object bounding box from relative coordinates to absolute
        # coordinates based on the original image resolution
        ymin, xmin, ymax, xmax = obj['bounding_box']
        xmin = int(xmin * original_image_np.shape[1])
        xmax = int(xmax * original_image_np.shape[1])
        ymin = int(ymin * original_image_np.shape[0])
        ymax = int(ymax * original_image_np.shape[0])

        # Find the class index of the current object
        class_id = int(obj['class_id'])

        # Draw the bounding box and label on the image
        color = [int(c) for c in COLORS[class_id]]
        cv2.rectangle(original_image_np, (xmin, ymin), (xmax, ymax), color, 2)
        # Make adjustments to make the label visible for all objects
        y = ymin - 15 if ymin - 15 > 15 else ymin + 15
        label = "{}: {:.0f}%".format(classes[class_id], obj['score'] * 100)
        cv2.putText(original_image_np, label, (xmin, y),
        cv2.FONT_HERSHEY_SIMPLEX, 0.5, color, 2)

    # Return the final image
    original_uint8 = original_image_np.astype(np.uint8)
    return original_uint8
上記2つの関数を使って、物体検出を行う関数です。
4. 推論
image_path = str(IMAGE_LIST[0])
interpreter = tf.lite.Interpreter(model_path=str(MODEL_PATH))
interpreter.allocate_tensors()

COLORS = np.random.randint(0, 255, size=(len(classes), 3), dtype=np.uint8)

detection_result_image = run_odt_and_draw_results(image_path=image_path, interpreter=interpreter)
# Show the detection result
Image.fromarray(detection_result_image)
実際に推論をしてみた画像がこちら

チョキ単体の場合、「チョキ:86%」という結果に。
一方、すべての手が1枚に移っている画像では、
グーは検出されず、パーは「チョキ:66%」と誤認識され、チョキは「チョキ:54%」となっています。
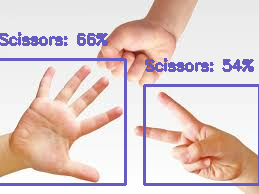
後者のように誤認識されてしまう理由として、
「学習画像内に手が一つしかなかったこと」「画像いっぱいに手が写っていたこと」などが考えられると思います。
2枚目の写真のように、複数手がある画像を学習しておらず、かつ手が小さいため推論制度が低下した可能性があります。
次回は、このモデルをラズパイへ移してカメラから推論します。
-
-
-
-
- 関連記事-----
-
-
-
melostark.hatenablog.com
melostark.hatenablog.com
melostark.hatenablog.com
melostark.hatenablog.com
melostark.hatenablog.com
melostark.hatenablog.com
melostark.hatenablog.com
melostark.hatenablog.com